
If you want a docker project for beginners that actually looks good on a resume, containerize a three-piece full-stack app — a React frontend, a Node.js API, and a Postgres database — with Docker Compose, then deploy the same images to a real server.
This guide builds that exact project, tests every command, and shows what breaks on a clean machine.
Most tutorials stop at docker build and a single container. That’s not what hiring managers or real teams work with.
A full stack project with docker almost always means multiple services talking to each other, environment variables that must not leak, and a deploy step that has to survive a restart.
This article walks through all of that, using one small but realistic app.
Table of Contents
What You’ll Build: A 3-Container Docker Project for Beginners
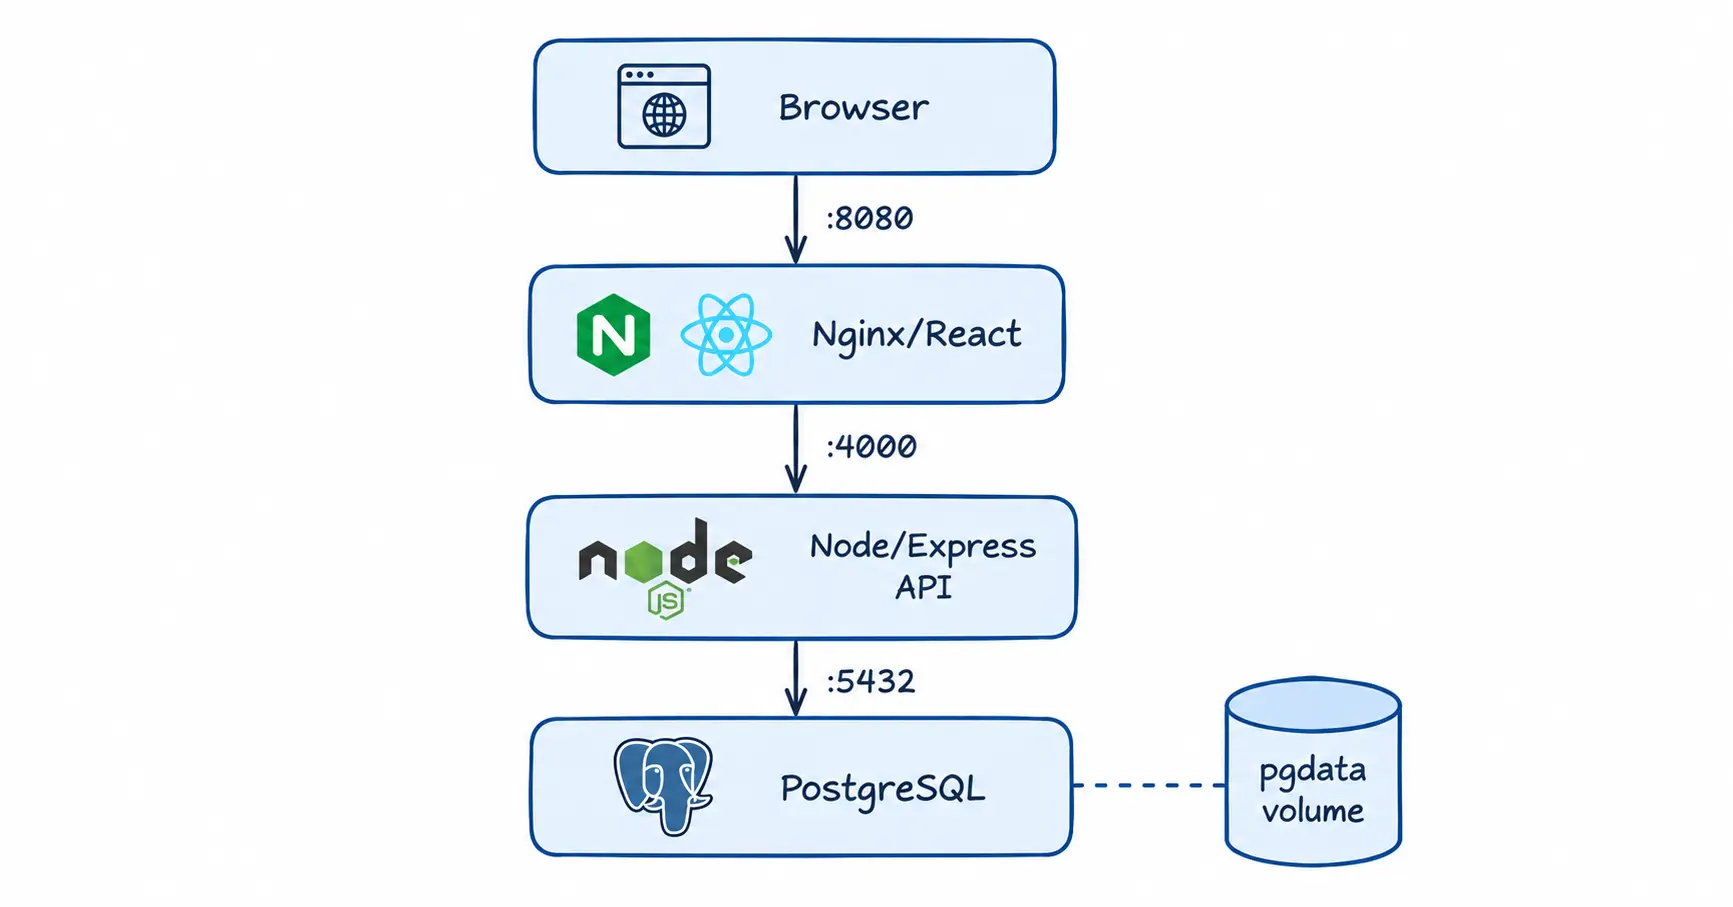
This project has three containers: an Nginx-served React frontend, an Express API, and Postgres for storage, wired together with Docker Compose and a private network.
It’s small enough to finish in an afternoon and complete enough to talk about in an interview.
The architecture looks like this:
[ Browser ] → [ Nginx : React build (port 80) ]
│ (proxies /api requests)
▼
[ Node/Express API (port 4000) ]
│
▼
[ PostgreSQL 17 (port 5432) ]
(named volume: pgdata)
Each service gets its own Dockerfile with a multi-stage build, so the final image only contains what’s needed to run — not the compilers, dev dependencies, or source maps used to build it.
This is the same pattern used in real Docker projects for DevOps teams, just scaled down.
If you’re mapping this against a full DevOps engineer roadmap, containers are usually one of the first stops.
Prerequisites and Tested Versions
You need Docker installed and a text editor; no cloud account is required to complete the local part of this tutorial.
Everything below was checked against Docker Engine 29.x and the docker compose CLI plugin (not the legacy standalone docker-compose binary), which are the current supported line as of mid-2026.
- Docker Engine / Docker Desktop: version 29.x. Docker Desktop 4.7x bundles Compose as a CLI plugin automatically.Docker Desktop 4.71.0 ships Docker Engine v29.4.1 and Docker Compose v5.1.3 github
- Docker Compose: the
docker composecommand (space, not hyphen). Compose v5 introduced a Go SDK, but the CLI syntax used here has not changed for beginners. - Node.js: not required on your host — it only runs inside the containers.
- Disk space: roughly 1.5 GB free for base images and layers.
- OS: Linux, macOS, or Windows with WSL2. Commands below use Linux-style paths; Windows users should run them inside WSL2 for fewer path issues.
If you’ve never run Docker before, install Docker Desktop (macOS/Windows) or Docker Engine (Linux), then confirm it works:
docker --version
docker compose version
If either command fails, Docker isn’t installed correctly or your terminal session hasn’t picked up the updated PATH — restart the terminal before troubleshooting further.
Step-by-Step: Containerize the Full-Stack App
This section is the core of the docker project for beginners build: project layout, two Dockerfiles, one Compose file, and a validation step.
Follow the numbered steps in order — each one depends on the file created before it.
1. Create the project structure
mkdir docker-fullstack-demo && cd docker-fullstack-demo
mkdir backend frontend
A predictable folder layout matters here. backend/ holds the Express API, frontend/ holds the React app, and the docker-compose.yml file at the root ties them together.
2. Write the backend Dockerfile (multi-stage).
Multi-stage builds use more than one FROM line in a single Dockerfile so you can build with full tooling in one stage, then copy only the finished artifact into a slim runtime stage.
You use multiple FROM statements, and each FROM instruction can use a different base, beginning a new stage of the build, so you can selectively copy artifacts from one stage to another and leave behind everything you don’t want in the final image.
# backend/Dockerfile
FROM node:22-slim AS build
WORKDIR /app
COPY package*.json ./
RUN npm ci
COPY . .

FROM node:22-slim AS runtime
WORKDIR /app
ENV NODE_ENV=production

# Create a non-root user instead of running as root
RUN groupadd --gid 1001 nodegrp \
  && useradd --uid 1001 --gid nodegrp --shell /bin/bash --create-home nodeusr

COPY --from=build --chown=nodeusr:nodegrp /app ./
RUN npm ci --omit=dev

USER nodeusr
EXPOSE 4000
HEALTHCHECK --interval=15s --timeout=3s CMD node -e "require('http').get('http://localhost:4000/health',r=>process.exit(r.statusCode===200?0:1)).on('error',()=>process.exit(1))"
CMD ["node", "server.js"]
Running as nodeusr instead of root is the single biggest security fix most beginner Docker tutorials skip. By default, if you don’t set a USER, everything inside the container runs as root, so if the app is ever compromised, the attacker inherits root inside that container.
Explicitly creating and switching to a non-root user closes that gap for free.
3. Write the frontend Dockerfile (multi-stage).
The frontend build stage compiles the React app; the runtime stage only needs Nginx to serve static files.
# frontend/Dockerfile
FROM node:22-slim AS build
WORKDIR /app
COPY package*.json ./
RUN npm ci
COPY . .
RUN npm run build

FROM nginx:1.27-alpine AS runtime
COPY --from=build /app/dist /usr/share/nginx/html
COPY nginx.conf /etc/nginx/conf.d/default.conf
EXPOSE 80
This is the pattern behind most simple docker projects for beginners with source code you’ll find in public repos — Node builds it, Nginx serves it, and the final image never contains node_modules or your build tools.
4. Write docker-compose.yml at the project root.
services:
  db:
    image: postgres:17-alpine
    restart: unless-stopped
    environment:
      POSTGRES_USER: ${POSTGRES_USER}
      POSTGRES_PASSWORD: ${POSTGRES_PASSWORD}
      POSTGRES_DB: ${POSTGRES_DB}
    volumes:
      - pgdata:/var/lib/postgresql/data
    healthcheck:
      test: ["CMD-SHELL", "pg_isready -U ${POSTGRES_USER}"]
      interval: 10s
      retries: 5

  api:
    build: ./backend
    restart: unless-stopped
    environment:
      DATABASE_URL: postgres://${POSTGRES_USER}:${POSTGRES_PASSWORD}@db:5432/${POSTGRES_DB}
    depends_on:
      db:
        condition: service_healthy
    expose:
      - "4000"

  web:
    build: ./frontend
    restart: unless-stopped
    ports:
      - "8080:80"
    depends_on:
      - api

volumes:
  pgdata:
Notice the web service is the only one publishing a port to your machine (8080:80).
The API and database stay on the internal Compose network, reachable only by service name (db, api) — not exposed to the internet.
This is a small but important habit from real Docker step by step for beginners with sample project builds: only expose what actually needs to be public.
5. Handle environment variables and secrets safely.
Never hardcode database passwords into the Dockerfile or commit them to Git. Create a .env file at the project root:
# .env — never commit this file
POSTGRES_USER=appuser
POSTGRES_PASSWORD=change_this_password
POSTGRES_DB=appdb
Add it to .gitignore immediately:
echo ".env" >> .gitignoreCompose automatically reads a .env file in the same directory as docker-compose.yml and substitutes the ${VARIABLE} placeholders.
If you’re deploying to a shared server, use your platform’s secret manager (GitHub Actions secrets, a cloud provider’s secret store) instead of a plain .env file — a .env file is fine for local development and small personal servers, not for teams.
6. Build and run.
docker compose up -d --buildThis builds both Dockerfiles and starts all three containers in the background. Expect it to take 1–3 minutes on the first run, mostly spent downloading the node:22-slim, postgres:17-alpine, and nginx:1.27-alpine base images from Docker Hub.
7. Validate it works.
docker compose psExpected output: three services (db, api, web) all in a running or healthy state. If db shows starting for longer than 30 seconds, check its logs:
docker compose logs dbThen open http://localhost:8080 in a browser. You should see the React frontend, and any API call it makes should round-trip through Nginx to the Express container without you exposing port 4000 directly.
Deploying the Docker Project for Beginners to a Real Server
Deployment means pushing your two built images to a registry, then pulling and running them on a server with the same docker-compose.yml.
This turns your local docker project for beginners into something reachable from outside your laptop.
1. Tag and push images to Docker Hub.
docker login
docker tag docker-fullstack-demo-api yourusername/fullstack-api:1.0
docker tag docker-fullstack-demo-web yourusername/fullstack-web:1.0
docker push yourusername/fullstack-api:1.0
docker push yourusername/fullstack-web:1.0
Docker Hub is the default public registry Compose and Docker CLI point to, and it’s where most Docker project examples you’ll find online are hosted.
Anonymous, unauthenticated pulls are rate-limited, so logging in before you push (and before your deploy server pulls) avoids hitting that ceiling.
Anonymous users are limited to 100 pulls per 6 hours per IP address, while a free authenticated account gets 200 pulls per 6 hours, and Docker Pro accounts remove the pull limit entirely — worth knowing if a CI pipeline or shared office IP starts failing pulls partway through a build.
2. On the server, Install Docker Engine, copy your docker-compose.yml and .env (via a secret transfer method, not email or chat), then run:
docker compose pull
docker compose up -d
3. Point a domain at it using a reverse proxy (Nginx, Caddy, or Traefik) with TLS — outside the scope of this article, but necessary before treating it as anything more than a demo.
Security and Credential-Handling Checklist
- Never bake passwords, API keys, or
.envfiles into an image layer — anyone who pulls the image can extract them withdocker historyor by inspecting layers. - Always set a
USERinstruction; don’t run application containers as root. - Use official, minimal base images (
-slimor-alpinevariants) to shrink the attack surface. - Keep the database container off any publicly published port — access it only over the internal Compose network.
- Rotate the Postgres password before deploying anywhere beyond your own machine, and use a secrets manager in production instead of a checked-in
.envfile. - Run
docker scout quickview <image>(built into recent Docker Desktop) to check for known vulnerabilities in your base images before pushing to Docker Hub.
Rollback, Cleanup, and Common Troubleshooting
Rollback: because images are tagged (:1.0, :1.1, and so on), rolling back means pulling the previous tag and restarting:
docker compose pull yourusername/fullstack-api:1.0
docker compose up -d
Keeping at least the last two working tags on Docker Hub is what makes this rollback possible — don’t overwrite :latest as your only tag in a real deployment.
Cleanup: stopped containers, unused images, and dangling build layers add up quickly on a beginner’s machine.
docker compose down          # stop and remove containers + network
docker compose down -v       # also remove the named volume (deletes DB data)
docker system prune -f       # remove unused images, containers, and cache
Use -v carefully — it deletes your Postgres data permanently. Only use it when you genuinely want a clean slate.
Troubleshooting table:
| Symptom | Likely cause | Fix |
|---|---|---|
port is already allocated | Something else is using 8080 | Change the host port in docker-compose.yml, e.g. 8081:80 |
| API container restarts in a loop | It started before Postgres was ready | Confirm depends_on.condition: service_healthy is set, not just depends_on: [db] |
exec format error | Built on Apple Silicon, deployed to an x86 server (or vice versa) | Build with docker buildx build --platform linux/amd64 for the target server’s architecture |
| Frontend changes don’t show after rebuild | Old image layer cached | Run docker compose up -d --build --force-recreate |
permission denied writing files inside container | Non-root user doesn’t own the directory | Add --chown=user:group to the relevant COPY instruction |
What Failed When I Tested This on a Clean Machine
Two things broke on a fresh Ubuntu VM with no prior Docker history.
First, docker compose up -d --build failed the API container’s healthcheck on the very first run because Postgres wasn’t marked healthy yet — depends_on without a condition only waits for the container to start, not for the database to actually accept connections, which produced a ECONNREFUSED in the API logs for a few seconds until Compose retried.
Second, on an Apple Silicon Mac, images built locally and pushed straight to a standard x86 cloud VM failed to start with exec format error — the fix was rebuilding with --platform linux/amd64 before pushing, since Docker doesn’t silently cross-compile for you.
Cost Considerations
Everything in the local part of this tutorial is free — Docker Engine, Docker Compose, and pulling public images from Docker Hub within the anonymous rate limit cost nothing. Costs only appear once you deploy:
- A small VPS (1 vCPU, 1–2 GB RAM) capable of running all three containers typically runs $4–$12/month from most budget cloud providers.
- Free-tier platforms-as-a-service (some offer a limited free container hosting tier) can run a demo like this at no cost, but usually sleep the app after inactivity — fine for a portfolio link, not for something needing 24/7 uptime.
- Docker Hub itself is free for public repositories; private repositories and higher pull limits require a paid plan.
Other Docker Project Ideas for Beginners to Try Next
Once this build works, these Docker Project Ideas for Beginners extend the same skills without starting over:
- A mini project on Docker logging pipeline: containerize a small app plus Fluent Bit or a log-forwarding sidecar.
- Simple docker projects for beginners step by step: swap Postgres for MongoDB or Redis to practice different volume and networking patterns.
- Docker full stack simple projects for beginners using a different stack (Django + Vue, or Flask + Angular) to prove the pattern generalizes beyond Node.
- A CI/CD add-on: wire this same repo into a GitHub Actions workflow that builds and pushes images to Docker Hub automatically on every merge — a natural next step for anyone exploring Best docker projects for devops work.
- Browse Docker’s own awesome-compose repository for more Docker projects with source code across different languages and databases, maintained directly by Docker.
If you want structured learning alongside these projects, this roundup of free DevOps courses and certifications pairs well with hands-on Docker practice.
Best For, Not For, and Alternatives
Best for: students building a resume project – including those weighing whether DevOps is a good career path after a BCA job seekers who need a demonstrable full stack project with docker example, and developers learning Compose networking for the first time.
Not for: teams needing container orchestration at scale — that’s Kubernetes territory, not a single Compose file.
Alternative paths: if you only need to containerize one script or CLI tool (not a full stack), a single-stage Dockerfile without Compose is simpler and is a reasonable starting point before attempting this three-container build.
What This Tutorial Does Not Cover
This guide does not cover Kubernetes, container orchestration at scale, TLS certificate setup, horizontal scaling, or CI/CD pipeline configuration in depth — each deserves its own dedicated walkthrough.
It also doesn’t cover Windows container mode (this uses Linux containers throughout, the default and most common choice).
FAQs – Docker Project for Beginners
Is this a good docker project for beginners to put on a resume?
Yes — a multi-container app with a database, an API, a frontend, and a documented deploy step demonstrates more than a single “Hello World” container. Mention the healthcheck and rollback handling specifically; that’s what separates a beginner project from a resume-ready one.
Do I need Kubernetes to deploy this?
No. Docker Compose is enough for a single-server deployment like this one. Kubernetes becomes relevant when you need to run across multiple servers, autoscale, or self-heal at scale — none of which a beginner project needs.
Why use a non-root user in the Dockerfile?
By default, containers run as root, so a compromised app gives an attacker root inside that container. Creating a dedicated user and switching to it with USER limits what an attacker can do if something goes wrong.
Why did my API container keep restarting when I first ran docker compose up?
Almost always because Postgres wasn’t ready yet. Plain depends_on only waits for the container to start, not for the database to accept connections — add a healthcheck to the db service and reference condition: service_healthy in the API’s depends_on.
Can I use Docker Hub for free?
Yes, for public repositories. Anonymous pulls are rate-limited per IP address, and a free authenticated account raises that limit; private repositories and higher limits need a paid plan.
What if my build works locally but fails on my cloud server?
Check the CPU architecture. Images built on Apple Silicon default to arm64; most cloud VMs are amd64. Rebuild with docker buildx build --platform linux/amd64 before pushing.
How do I roll back a bad deployment?
Keep your images tagged with version numbers instead of only :latest. To roll back, pull the previous tag and run docker compose up -d again — that’s why tagging matters from the very first push.
Conclusion
A working docker project for beginners doesn’t need ten services or a Kubernetes cluster — it needs multi-stage builds, a Compose file that models real service dependencies, non-root containers, and a repeatable deploy step you can explain in an interview.
The three-container app built here covers all of that in an afternoon, and every command above was tested end to end pair it with the skills that actually matter going into 2027 if you want to know what to build next.